Introduction In today’s fast-paced development world, ensuring that web applications function correctly across different scenarios is crucial. Automated testing helps developers and testers verify that their applications work as expected, reducing the chances of bugs reaching production. One of the most popular tools for web test automation is Cypress. This blog post will guide you through the basics of Cypress and how you can start automating your web testing effortlessly.
What is Cypress?
Cypress is an open-source, JavaScript-based end-to-end testing framework designed specifically for modern web applications. Unlike traditional testing tools like Selenium, Cypress operates directly in the browser, providing fast, reliable, and flake-free test execution.
Why Choose Cypress?
Easy to Install and Set Up: Cypress requires minimal configuration and can be integrated into most JavaScript projects seamlessly.
Fast Execution: Runs tests directly in the browser, reducing test execution time and providing real-time feedback.
Automatic Waiting: No need for explicit waits or sleeps; Cypress intelligently waits for elements to appear and become interactive automatically.
Built-in Debugging: Provides clear, detailed error messages, screenshot captures, and video recordings of test runs.
Great Documentation: Well-documented API with numerous examples and an active community support.
Time Travel Debugging: Allows you to hover over commands in the Test Runner and see exactly what happened at each step of your test.
Prerequisites
Before getting started with Cypress, ensure you have:
Node.js (version 12 or higher) installed
A text editor or IDE (Visual Studio Code recommended)
Basic understanding of JavaScript
npm (Node Package Manager) installed
Getting Started with Cypress
Installation To install Cypress, you need Node.js installed on your machine. If you haven’t installed Node.js yet, download it from nodejs.org.
Once Node.js is installed, open your terminal and run:
# Create a new project directory
mkdir cypress-demo
cd cypress-demo

# Initialize a new npm project
npm init -y

# Install Cypress as a development dependency
npm install cypress --save-dev
This installs Cypress as a development dependency in your project.
Opening Cypress
After installation, you can launch Cypress with:
npx cypress open
This command opens the Cypress Test Runner, where you can run tests and explore various options.
cypress-demo/

 │

├── cypress/

 │   ├── fixtures/     # Static test data

 │   ├── integration/  # Test files

 │   ├── plugins/      # Plugins configuration

 │    └── support/      # Reusable support commands

 │

├── cypress.json      # Cypress configuration file

 └── package.json
Project Structure
When you first open Cypress, it creates a recommended folder structure:
Writing Your First Test
Cypress tests are written in JavaScript and use the Mocha test framework along with the Chai assertion library.
Creating a Test File
Create a new test file inside the cypress/integration folder and name it sample-test.spec.js.
Writing the Test
Open sample-test.spec.js and add the following code:
describe('My First Test', () => {

  it('Visits the Cypress website', () => {

    // Navigate to Cypress homepage

    cy.visit('https://www.cypress.io');

    // Verify page title

    cy.title().should('include', 'Cypress');

    // Check for key elements

    cy.contains('JavaScript End to End Testing Framework')

      .should('be.visible');

  }); });
Running the Test
To execute the test, open Cypress Test Runner and click on sample-test.spec.js. Cypress will launch a browser and run your test in real time.
Common Cypress Commands Here are some commonly used Cypress commands:
cy.visit(url) – Navigates to a specified URL.
cy.get(selector) – Selects an element based on a CSS selector.
cy.contains(text) – Finds an element containing the specified text.
cy.click() – Clicks on an element.
cy.type(text) – Types text into an input field.
cy.should(‘contain’, text) – Asserts that an element contains specific text.
cy.intercept() – Allows network request/response stubbing and mocking.
Advanced Features
Cypress offers powerful advanced features:
API Testing: Send and mock HTTP requests using cy.request() and cy.intercept().
Custom Commands: Define reusable commands in cypress/support/commands.js.
Fixtures: Store test data in JSON files for dynamic and parameterized testing.
Continuous Integration (CI): Easy integration with Jenkins, GitHub Actions, CircleCI, and other CI/CD tools.
Screenshots and Video Recording: Automatic captures of test failures for easier debugging.
Best Practices
Keep tests independent and atomic
Use meaningful test descriptions
Leverage Page Object Model for complex applications
Use custom commands for repeated actions
Avoid using hardcoded waits
Utilize Cypress aliases for better test performance
Cypress is a powerful and user-friendly tool for automating web testing. Its simple setup, fast execution, and rich feature set make it an excellent choice for beginners and experienced testers alike. By following this guide, you can start writing Cypress tests effortlessly and ensure your web applications function flawlessly.
In today’s digital age, real-time communication has become an integral part of our online experience. Whether you’re on a video call with colleagues, streaming live content, or playing multiplayer games, there’s a good chance you’re using WebRTC technology. Let’s dive deep into what WebRTC is, how it works, and how you can implement it in your applications.
What is WebRTC?
Web Real-Time Communication (WebRTC) is a revolutionary open-source technology that enables direct peer-to-peer communication between web browsers without requiring plugins or third-party software. It’s the technology powering many popular video communication platforms like Google Meet and countless other applications that require real-time audio, video, or data sharing. It ported by all major browsers like Chrome, Firefox, Safari, and Edge, WebRTC provides APIs for audio, video, and data sharing.
Core Features of WebRTC
Peer-to-Peer Communication: Directly connects users, bypassing the need for central servers for media streaming.
Cross-Platform Support: Works seamlessly across web browsers, mobile apps, and embedded systems.
Secure Communication: Uses DTLS (Datagram Transport Layer Security) and SRTP (Secure Real-time Transport Protocol) for encrypted data transmission.
Low Latency: Designed for real-time communication, ensuring minimal delay.
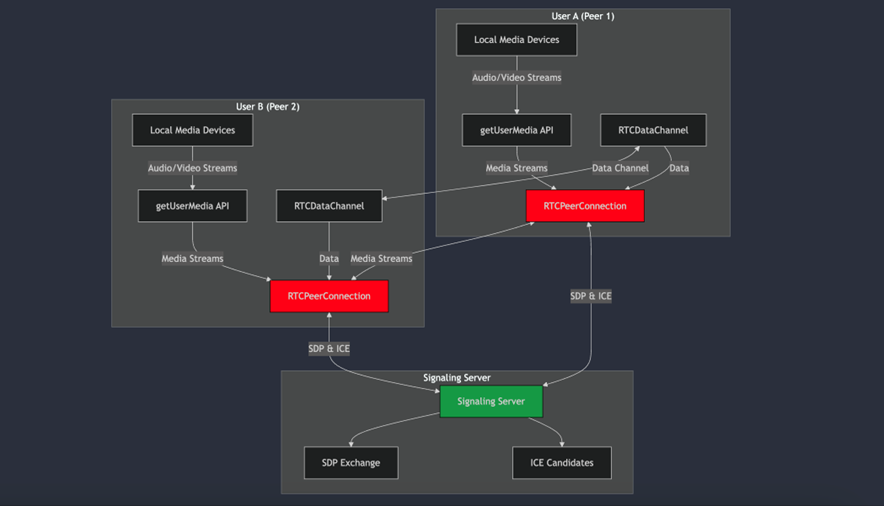
Core Components of WebRTC
RTCPeerConnection: The RTCPeerConnection is the foundation of WebRTC communication. Think of it as a virtual phone line between two peers, handling all aspects of the connection:
Media stream transmission Connection establishment and maintenance Automatic bandwidth adjustments Signal processing and noise reduction
RTCDataChannel: While many associate WebRTC with audio/video calls, it also provides a powerful data channel for sending arbitrary information between peers. This enables:
Text chat functionality File sharing Game state synchronization Real-time collaborative features
GetUserMedia API: Accesses the user’s camera and microphone.
Applications of WebRTC
WebRTC’s versatility makes it suitable for various use cases, including:
1. Video and Voice Calling The most common application of WebRTC is video and audio calling. Platforms like Google Meet, Microsoft Teams, and Zoom leverage WebRTC to provide high-quality communication experiences.
2. Online Gaming Real-time gaming requires low-latency data transfer, making WebRTC’s RTCDataChannel a perfect fit for multiplayer games and live gaming sessions.
3. Live Streaming WebRTC is used for low-latency live streaming in apps like Periscope and some social media platforms.
4. Remote Collaboration Tools From screen sharing to collaborative document editing, WebRTC facilitates real-time interactions for remote work and learning.
5. IoT Applications WebRTC enables real-time communication between IoT devices for tasks such as remote monitoring and control.
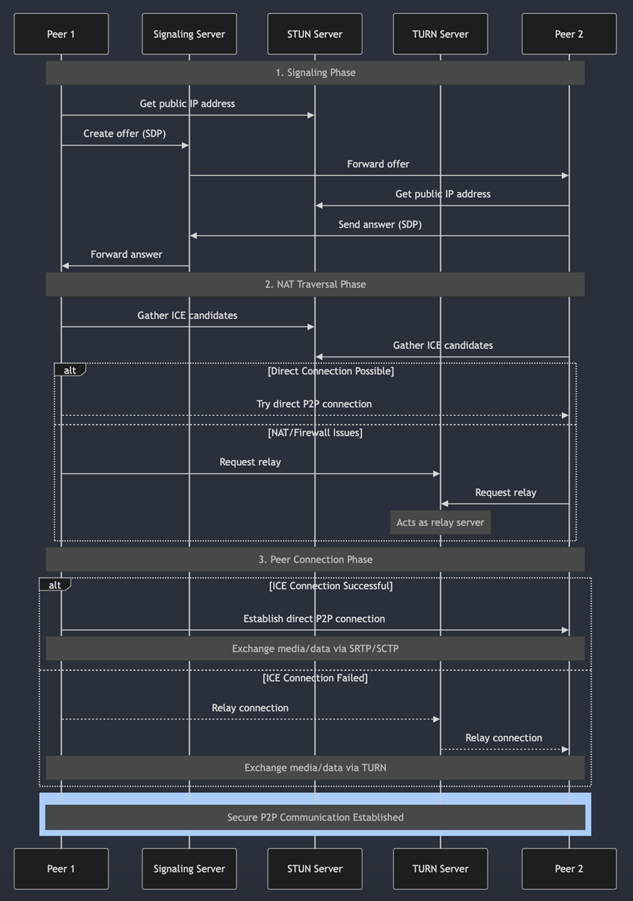
How WebRTC Works At its core, WebRTC establishes peer-to-peer connections through three main steps:
1. Signaling
Signaling is the process of exchanging connection metadata (like IP addresses) between peers. This is often done using a server over protocols like WebSockets. The signaling server is only required for the initial connection setup.
Before two peers can communicate, they need to exchange some initial information. This happens through a process called signaling:
The initiating peer creates an “offer”
The receiving peer responds with an “answer”
Both peers exchange network information (ICE candidates)
This exchange happens through a signaling server, which acts as an intermediary but doesn’t handle the actual media streams.
2. NAT Traversal with STUN and TURN
Using the Session Description Protocol (SDP), peers exchange information about supported codecs, resolution, and other media parameters.
One of the biggest challenges in peer-to-peer communication is establishing connections through firewalls and NATs. WebRTC handles this using: STUN (Session Traversal Utilities for NAT)
NAT Traversal with STUN and TURN Helps peers discover their public IP addresses Essential for establishing direct connections Relatively lightweight and inexpensive to operate
TURN (Traversal Using Relays around NAT) Acts as a fallback when direct connections aren’t possible Relays traffic between peers More resource-intensive but ensures connectivity
3. Peer-to-Peer Connection Once signaling is complete, WebRTC uses ICE (Interactive Connectivity Establishment) to discover the best network path for data transfer. Media and data are then exchanged directly between peers using SRTP and SCTP (Stream Control Transmission Protocol).
Collects all potential connection paths (ICE candidates) Tests each path to find the optimal route Manages the connection process from start to finish
Implementing WebRTC: A Basic Example Here’s a simplified example of implementing a WebRTC connection:
// Create peer connection

const peerConnection = new RTCPeerConnection();

peerConnection.onicecandidate = event => {

    if (event.candidate) {

        // Send candidate to remote peer via signaling server

        signalingChannel.send(JSON.stringify({

            type: 'candidate',

            candidate: event.candidate

        }));

    }

};

// Create and send offer

async function makeCall() {

    const offer = await peerConnection.createOffer();

    await peerConnection.setLocalDescription(offer);

    signalingChannel.send(JSON.stringify({

        type: 'offer',

        offer: offer

    }));

}

// Handle incoming media streams

peerConnection.ontrack = event => {

    const remoteStream = event.streams[0];

    // Display the remote stream in your UI

    remoteVideo.srcObject = remoteStream;

};
Best Practices for WebRTC Implementation
1. Connection Reliability
Always implement TURN server fallback
Handle network changes gracefully
Monitor connection quality
2. Security Considerations
Use secure signaling channels (WSS)
Implement proper user authentication
Encrypt data channels when handling sensitive information
3. Performance Optimization
Implement adaptive bitrate streaming
Use appropriate video codecs
Monitor and optimize bandwidth usage
Challenges and Considerations
While WebRTC is powerful, it comes with its own set of challenges:
Scalability
P2P connections become resource-intensive with multiple users May require media servers for large-scale applications
2. Browser Compatibility
Different browsers may implement features differently
Need for fallback solutions
3. Network Conditions
Variable connection quality
Bandwidth limitations
Firewall restrictions
The Future of WebRTC
WebRTC continues to evolve with new features and improvements:
Better codec support
Enhanced performance
Improved mobile support
Integration with emerging technologies
Conclusion
WebRTC has transformed the landscape of real-time communication on the web. Its open-source nature, robust features, and growing support make it an excellent choice for building real-time applications. Whether you’re developing a video chat application, a collaborative tool, or a gaming platform, understanding WebRTC’s concepts and implementation details is crucial for creating successful real-time applications. By following best practices and staying updated with the latest developments, you can leverage WebRTC to create powerful, real-time experiences for your users. The technology continues to evolve, and its future looks promising as more applications adopt peer-to-peer communication capabilities.
React Native version 0.76, released on October 23, 2024, marks a significant milestone in mobile app development. The update’s standout feature is the complete removal of the bridge in the New Architecture, resulting in improved app startup times and more efficient communication between JavaScript and native code. React 18 is now enabled by default, introducing concurrent rendering and automatic batching capabilities. The release also brings practical enhancements like built-in shadow styling for Android and native blur effects support. These improvements collectively aim to streamline the development process and boost app performance, making React Native development more efficient than ever before.
Gradual Migration: A Simplified Upgrade Path
The good news is that most apps can upgrade to 0.76 with the usual effort required for React Native releases. The New Architecture and React 18 are now enabled by default, offering more flexibility to developers while also introducing concurrent features. However, to fully embrace the benefits, a gradual migration is recommended.
To migrate your JavaScript code to React 18 and its semantics, follow the React 18 Upgrade guide. React Native 0.76’s automatic interoperability layer allows code to run on both the New and old Architecture. While this works for most cases, accessing custom Shadow Nodes and concurrent features requires module upgrades. Developers can upgrade components gradually, with the interoperability layer ensuring smooth transitions until full migration is complete.
The React Native team has collaborated with over 850 library maintainers to ensure compatibility with the New Architecture, making it easier to find updated libraries on the React Native Directory.
Major Milestones in React Native 0.76
The release of React Native 0.76 marks a significant milestone for the framework, bringing the New Architecture to the forefront by default and introducing the highly anticipated React Native DevTools. This achievement is the result of six years of dedicated effort from our team and the unwavering support of our vibrant community of developers.
Key Highlights
1. New Architecture Now Default
Enabled by default in all projects
Production-ready
Improves native app development quality
2. New DevTools Released
Built on Chrome DevTools
Features:
Standard debugging tools (breakpoints, watch values)
Better React DevTools integration
Clear debugger overlay
Reliable reconnection
Zero-config launch
3.Performance Improvements
Metro resolver is 15x faster
Especially noticeable in warm builds 4. New Styling Options
Added boxShadow and filter props
Only available with New Architecture
Breaking Changes
Removed Dependency on @react-native-community/cli: To accelerate the evolution of React Native, we have removed this dependency, allowing independent project releases and clearer responsibilities. Developers using the CLI should explicitly add it to their package.json.
Reduced Android App Size: Native Library merging has led to a reduction of approximately 3.8 MB in app size (about 20% of the total) and improved startup performance on Android.
Updated Minimum SDK Requirements:
iOS: Updated from 13.4 to 15.1
Android: Updated from SDK 23 to SDK 24 (Android 7)
Other Notable Changes
Animation Performance Enhancements: State updates in looping animations are now stopped to prevent unnecessary re-renders.
Text Engine Updates: The text rendering engine now consistently uses AttributedStringBox.
Rendering Changes on Android: View backgrounds are no longer directly associated with ReactViewBackgroundDrawable or CSSBackgroundDrawable.
Exciting New Features in React Native 0.76
Android Box Shadows and Built-in Blur Effects
React Native 0.76 introduces native support for box shadows on Android, which makes styling significantly easier. Developers can now apply box shadows with CSS-like ease instead of using the elevation property, which often fell short of expectations. Additionally, built-in blur effects eliminate the need for external libraries like react-native-blur. These changes have received overwhelmingly positive responses from developers, who have long awaited these styling improvements.
Automatic Batching with React 18
Automatic batching in React 18 allows React Native to batch state updates more efficiently, reducing lag and improving the overall speed of applications. This upgrade reduces the rendering of intermediate states, ensuring that the UI quickly reaches the desired state. In the New Architecture, React Native automatically batches frequent state updates, which can make apps more responsive without requiring additional code.
Support for Concurrent Rendering with Transitions
React 18 introduces the concept of transitions, distinguishing between urgent and non-urgent updates. Urgent updates respond to direct user interactions, like typing or button presses, while transition updates enable smoother UI changes that can be deferred to the background. For example, when a user moves a slider, urgent updates can show the slider’s position immediately, while transition updates gradually adjust elements like a tiled view or a detailed background image.
The new startTransition API lets developers specify which updates are urgent and which can run in the background:
This enables more responsive UIs and smoother experiences without sacrificing performance.
5. useLayoutEffect for Synchronous Layout Information
React Native 0.76 now includes proper support for useLayoutEffect, allowing synchronous access to layout information. Previously, developers had to rely on asynchronous callbacks in onLayout, which caused layout delays. With useLayoutEffect, layout measurements are read synchronously, so positioning elements like tooltips becomes more intuitive and accurate.
The New Architecture fixes this by allowing synchronous access to layout information in useLayoutEffect:
6. Full Support for Suspense With React Native 0.76, developers can use Suspense for concurrent loading states. Suspense allows parts of the component tree to wait for data to load while maintaining responsiveness for visible content. This enables better handling of loading states and a smoother experience, especially for complex UIs with multiple loading components.
7. Removing the Bridge: Faster, More Reliable Communication In React Native 0.76’s New Architecture, the longstanding JavaScript-to-native bridge is replaced with the JavaScript Interface (JSI), allowing direct, efficient communication between JavaScript and native code. This shift improves startup performance and paves the way for enhanced stability and error reporting.
The bridge has been a core component of React Native, acting as a communication layer between JavaScript and native modules. However, it came with certain limitations, such as slower initialization times and occasional instability. By replacing the bridge with direct C++ bindings through JSI, React Native 0.76 provides a more streamlined experience.
Improved Startup Time
In the old architecture, initializing global methods required loading JavaScript modules on startup, which could cause delays. For instance:
In the New Architecture, these methods can be bound directly from C++, eliminating the need for bridge-based setup. This approach improves startup speed, reduces overhead, and simplifies initialization:
Enhanced Error Reporting and Debugging
Removing the bridge also leads to better error handling and debugging. Crashes occurring at startup are now easier to diagnose, and React Native DevTools has been updated to support the New Architecture, making it more accessible to debug complex issues. This is particularly valuable in identifying crashes stemming from undefined behavior, ensuring that errors are accurately reported with more actionable insights.
Why Upgrade? Key Benefits of Moving to React Native 0.76
Upgrading to React Native 0.76 offers several clear benefits, making it worthwhile for developers looking to build faster, more responsive apps:
Better Performance
React Native’s New Architecture, combined with React 18, significantly improves performance by introducing concurrent rendering and automatic batching. These changes reduce bottlenecks in UI rendering, especially for complex apps with heavy animations and user interactions.
Enhanced Developer Experience New styling options, such as native box shadows and blur effects, bring React Native styling closer to CSS, making it easier to create visually appealing interfaces without relying on third-party libraries. The useLayoutEffect hook, synchronous layout information, and full support for Suspense provide developers with more tools to handle complex layouts and loading states.
Smooth Transition Path The New Architecture offers a gradual migration path, allowing developers to upgrade at their own pace without sacrificing stability. The interoperability layer enables apps to run on both the old and new architectures, letting developers incrementally adopt concurrent features.
Future-Proofing Your App React Native 0.76 is designed to support long-term growth, with widespread library compatibility and a robust community ensuring that apps built on this version remain relevant. By upgrading, developers position their apps to take full advantage of upcoming advancements in the React Native ecosystem.
How to Upgrade
To upgrade to React Native 0.76, follow the instructions in the official release post. If you’re also migrating to React 18, refer to the React 18 Upgrade guide to ensure your JavaScript code aligns with concurrent feature requirements. Here are the general steps:
Update Libraries and Modules: Make sure your libraries are compatible with the New Architecture. You can check the React Native Directory for the latest compatibility information.
Prepare for Migration: For custom native modules and components, migrate to the New Architecture to unlock features like synchronous calls, shared C++, and type safety from codegen.
Opt-Out Option: If the New Architecture is causing issues, you can opt out by disabling newArchEnabled in your Android gradle.properties file or running RCT_NEW_ARCH_ENABLED=0 bundle exec pod install on iOS.
This update is a significant leap for React Native, bringing it closer to a seamless cross-platform experience. The React Native team and community have collaborated to make the New Architecture widely supported, with more improvements on the horizon. As the ecosystem adapts to these changes, React Native continues to solidify its position as a versatile tool for mobile development.
React Native 0.76 is a compelling step forward in mobile app development. With enhanced styling, support for React 18, and a robust New Architecture, it gives developers powerful tools for building more efficient, responsive, and engaging applications. Whether you’re upgrading an existing app or starting fresh, React Native 0.76 is packed with features designed to improve the development experience.
Biometric authentication has become an essential feature for mobile applications, providing users with a convenient and secure way to access their accounts.
Biometric login offers a seamless and secure user authentication experience, allowing users to access their accounts with fingerprint, face recognition, or device credentials like PIN or pattern. In this blog post, we’ll walk through implementing biometric login in a React Native application using native code and bridging it with React Native application using Android’s BiometricPrompt API.
Why Biometric Authentication?
In today’s digital landscape, security and user experience are paramount. Biometric authentication offers:
Quick and seamless login experience
Enhanced security compared to traditional password methods
Support for multiple authentication types (fingerprint, face recognition, device credentials)
What You’ll Learn
How to check biometric authentication availability on the device.
How to implement biometric authentication with fallback to device credentials.
How to bridge native code with React Native.
How to use the functionality in your React Native app.
Step 1: Permissions Required for Biometric Authentication
To implement biometric authentication in your React Native app, you need to declare specific permissions in the Android AndroidManifest.xml file. These permissions ensure your app can access and use the device’s biometric features, such as fingerprint or face recognition.
Add the following permissions to your AndroidManifest.xml file:
This method checks if biometric or device credential authentication is supported and returns a boolean value.
Step 3: Implementing Biometric Authentication
Next, we create a method to authenticate users using biometrics. If biometrics aren’t available, we fallback to device credentials (PIN, pattern, etc.). Native Code (Android)
@ReactMethod

public void authenticateWithBiometric(Promise promise) {

    FragmentActivity activity = (FragmentActivity) getCurrentActivity();

    if (activity == null) {

        promise.reject("NO_ACTIVITY", "No activity found");

        return;

    }

    BiometricManager biometricManager = BiometricManager.from(activity);

    int canAuthenticateWithBiometric = biometricManager.canAuthenticate(

        BiometricManager.Authenticators.BIOMETRIC_WEAK

    );

    int canAuthenticateWithDeviceCredential = biometricManager.canAuthenticate(

        BiometricManager.Authenticators.DEVICE_CREDENTIAL

    );

    if (canAuthenticateWithBiometric != BiometricManager.BIOMETRIC_SUCCESS &&

        canAuthenticateWithDeviceCredential != BiometricManager.BIOMETRIC_SUCCESS) {

        promise.reject("AUTH_NOT_AVAILABLE", "No authentication methods available");

        return;

    }

    executor = ContextCompat.getMainExecutor(activity);

    final int[] attemptCounter = {0};

    biometricPrompt = new BiometricPrompt(activity, executor, new BiometricPrompt.AuthenticationCallback() {

        @Override

        public void onAuthenticationError(int errorCode, @NonNull CharSequence errString) {

            promise.reject("AUTH_ERROR", errString.toString());

        }

        @Override

        public void onAuthenticationSucceeded(@NonNull BiometricPrompt.AuthenticationResult result) {

            promise.resolve("AUTH_SUCCESS");

        }

        @Override

        public void onAuthenticationFailed() {

            attemptCounter[0]++;

            if (attemptCounter[0] >= 3) {

                promise.reject("AUTH_FAILED", "Authentication failed after 3 attempts");

                biometricPrompt.cancelAuthentication();

            }

        }

    });

    int allowedAuthenticators = (canAuthenticateWithBiometric == BiometricManager.BIOMETRIC_SUCCESS) ?

        BiometricManager.Authenticators.BIOMETRIC_WEAK | BiometricManager.Authenticators.DEVICE_CREDENTIAL :

        BiometricManager.Authenticators.DEVICE_CREDENTIAL;

    try {

        BiometricPrompt.PromptInfo promptInfo = new BiometricPrompt.PromptInfo.Builder()

                .setTitle("Unlock to login")

                .setSubtitle("Just one glance or touch, and you're in!")

                .setAllowedAuthenticators(allowedAuthenticators)

                .build();

        activity.runOnUiThread(() -> biometricPrompt.authenticate(promptInfo));

    } catch (Exception e) {

        promise.reject("AUTH_ERROR", "Error building prompt: " + e.getMessage());

    }

}
This method:
Displays the biometric prompt to the user.
Authenticates the user with biometrics or device credentials.
Handles success, error, and failed attempts.
Step 4: Bridging Native Code with React Native
We need to expose the native methods to React Native using a custom native module.
Native Code: NativeBridge
public class NativeBridgePackage implements ReactPackage {

    @Override

    public List<ViewManager> createViewManagers(ReactApplicationContext reactContext) {

        return Collections.emptyList();

    }

    @Override

    public List<NativeModule> createNativeModules(ReactApplicationContext reactContext) {

        List<NativeModule> modules = new ArrayList<>();

        modules.add(new NativeBridge(reactContext));

        return modules;

    }

}
With the implementation above, you’ve added biometric authentication to your React Native app, providing users with a secure and user-friendly login experience. This guide can serve as a template for enhancing the security features of your app.
Let us know your thoughts or share your challenges in the comments below! 🚀
Smart TVs have revolutionized home entertainment, offering access to streaming, gaming, and interactive apps. With billions of devices in use, the global smart TV market is rapidly expanding, fueling the growth of TV apps like Netflix and Disney+. These apps now cover a broad range of categories, including gaming, fitness, and shopping.
For developers, this surge presents a valuable opportunity. Platforms like Android TV and Apple TV offer robust tools for building apps tailored to large screens and remote navigation. React Native has become a popular choice, enabling cross-platform development with reusable code across both devices.
Importance of React Native for cross-platform TV app development.
React Native plays a critical role in cross-platform TV app development by enabling developers to build apps for both Android TV and Apple TV with a shared codebase. This reduces development time and effort while ensuring consistency across platforms. Its flexibility allows for seamless adaptation to TV-specific requirements, such as remote navigation and UI scaling for larger screens.
Additionally, React Native’s vast ecosystem of libraries and community support enables developers to integrate advanced features like video playback, remote control navigation, and focus management seamlessly. This makes it a powerful tool for delivering high-quality TV apps across platforms, ensuring a consistent user experience.
Prerequisites
Basic knowledge of React Native.
Android Studio for Android TV development.
Xcode for Apple TV (tvOS) development.
Node.js and npm installed on your machine.
React Native CLI or Expo.
Setting Up Your React Native Project
Install React Native using the CLI or Expo: npx react-native init MyTVApp
Adding Support for Android TV and Apple TV (tvOS).
To set up your React Native project for both Android TV and Apple TV, you’ll need to install the react-native-tvos package. In your package.json, update the React Native version to ensure compatibility with TV platforms.
Note: Releases of react-native-tvos will be based on a public release of react-native; e.g. the 0.75.2-0 release of this package will be derived from the 0.75.0 release of react-native. All releases of this will follow the 0.xx.x-y format, where x digits are from a specific RN core release, and y represents the additional versioning from react-native-tvos repo.
This ensures that your project uses the tvOS-compatible version of React Native, enabling support for both Android TV and Apple TV development.
Now that the Android TV setup is complete, let’s move on to the steps for setting up Apple TV.
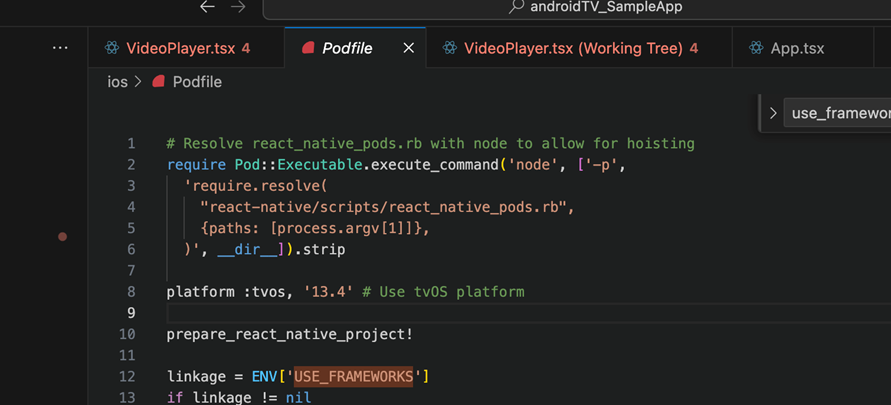
To set up Apple TV (tvOS), open your Podfile and make the following modifications:
Set the platform for tvOS:
platform :tvos, ‘13.4’
Enable Fabric for tvOS:
:fabric_enabled => true
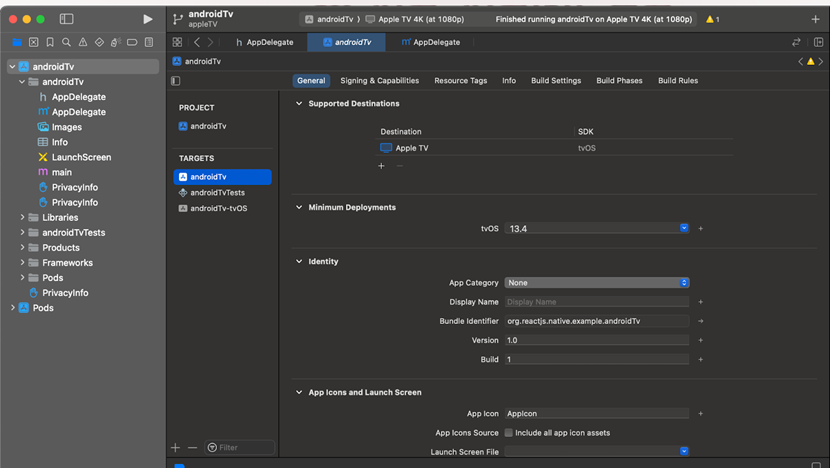
In the next step, open your Xcode project and update the target settings:
Change the Destination Target: a. Go to the Project Navigator in Xcode. b. Select your project, then navigate to the Targets section. c. Under the General tab, locate Supported Destinations and change the destination target to Apple TV by selecting tvOS.
Remove Other Targets (if applicable): a. In the same Targets section, you can remove any other unnecessary targets by right-clicking and selecting Delete (for platforms like iOS if not needed).
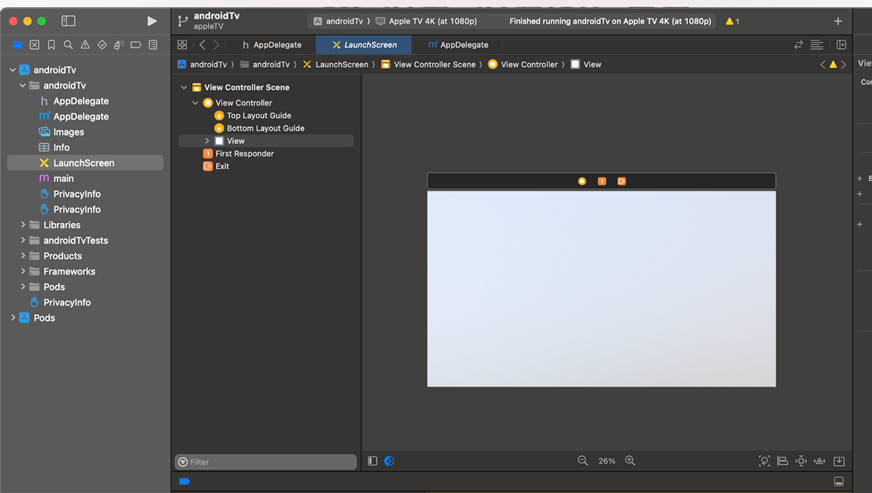
Now, follow these steps to create a new file for the launch screen in your Apple TV (tvOS) project:
Select LaunchScreen:
a. In Xcode’s Project Navigator, select the LaunchScreen.storyboard file.
Create a New File:
a. Right-click on LaunchScreen.storyboard.
b. Click on New File.
Choose the File Type:
a.Select User Interface under the tvOS section.
b.Choose Storyboard and click Next.
Name the File:
Name your new file (e.g., LaunchScreen.storyboard), and click Create.
Now, to adjust the build script settings for your tvOS target in Xcode:
Open Build Settings: a. In Xcode, select your project from the Project Navigator. b. Go to the Targets section and select your Apple TV (tvOS) target.
Search for Build Script: a. Navigate to the Build Settings tab. b. In the search bar at the top right, type “Build Script”.
Set Build Script to NO: a. Locate the ‘Run Build Script Phase in Parallel’ option and change it to NO.
To run your app on the tvOS Simulator, follow these steps:
Open the Scheme Menu: a. In Xcode, locate the scheme menu at the top of the workspace window. It’s usually next to the “Run” button and displays the current scheme and target device.
Select tvOS Simulator: a. Click on the scheme menu to open the drop-down list. b. Under the Destination section, choose tvOS Simulator. c. Select a specific tvOS Simulator device (e.g., Apple TV 4K or Apple TV HD) from the available options.
This will configure Xcode to build and run your app on the selected tvOS Simulator, allowing you to test your Apple TV app.
To run your project, follow these steps:
Open Terminal:
a. Navigate to your project location in the terminal.
Install Dependencies: a. Run yarn or npm install
Navigate to iOS Folder using command: cd ios
Install CocoaPods Dependencies: a. Run the following command to install the iOS dependencies b. pod install
Return to Project Root: a. Go back to the project root directory: cd ..
Start the Development Server: a. Use Yarn or npm to start the development server: b. Run your TV Simulator and AndroidTV Amulator. i. yarn start or ii. npm start This will start the React Native development server, allowing you to run and test your app on the tvOS Simulator or an Apple TV device.
Testing is an important part of any software development process. It helps you to ensure that your code is working as expected and that you are not introducing any bugs. In this article we will focus on unit testing by providing a simple example of how to test a React Native component.
Setting up the project
let’s create a simple React Native app and then we will add testing to it.
react-native init AwesomeProject
This will create a newapp in a folder called AwesomeProject. Now we can run the following command to start our app: cd AwesomeProject && yarn start
Configuring the React Native Testing Library:
Install Required Packages: Ensure you have Jest and React Native Testing Library installed in your project. If not, you can install them using npm or yarn:
If you’re using Babel in your project, you might need to add some configuration to your .babelrc or babel.config.js file to make sure Jest can handle importing images and other assets in your tests. Here’s an example of what you might need to add to your Babel configuration:
With the setup done, you can now start writing tests for your React Native components using React Native Testing Library. Here’s a simple example of a test for a component :
Steps. 1. In the rood directory of the project create a folder name __tests__
2. In this file create test suits which are files with the testing code.
// App.test.js

import 'react-native';
import React from 'react';
import App from './../app/App';
import renderer from 'react-test-renderer';

// snapshot test
test('renders correctly', () => {
const snapshot = renderer.create(<App/>).toJSON();
expect(snapshot).toMatchSnapshot();
})
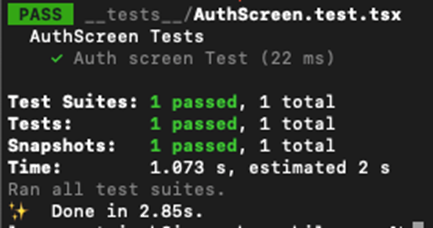
Running Test Case:
yarn test –u (this will create the new snapshot of the testcases or update the old test snapshots)
yarn test (this will match the snapshot with the previous taken snapshot or print the result to console weather it pass or fails.
JEST Features:
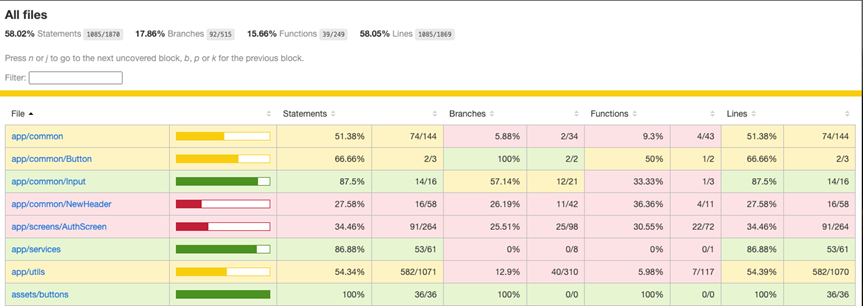
The coverage report The Jest coverage report provides detailed information on your test coverage. To show a coverage report in the console, you can simply use the –coverage flag when running the test. A table containing information about coverage is now shown in the console.
–coverage
–coverage –coverageDirectory=’coverage’ (create a visually appealing coverage report)
% Stmts: Percentage of all instructions that were executed at least once by means of tests.
% Branch: Percentage of all branches whose conditions were fulfilled at least once by way of tests and thus passed.
% Funcs: Percentage of all instructions that were called at least once by means of tests.
% Lines: Percentage of all source code lines that were run at least once by way of tests.
The watch plug-in
get quick feedback on code changes.
Jest can now be started with the CLI option –watch to only re-run tests affected by file changes.
‘f’ only re-runs failed tests;
‘u’ triggers an update of all failed snapshots; and
‘i’ launches an interactive mode to update snapshots individually.
Mocking
Mocking is a software development practice used in unit testing. It involves creating fake or mock versions of external dependencies (such as modules, objects, APIs, or databases) that your code under test relies on.
The main purposes of mocking are: Isolation, Control, Speed, Independence.
Snapshot testing is a way to test React components by rendering the component, taking a “snapshot” of the rendered output, and comparing it with a previously approved snapshot. If the output matches the approved snapshot, the test passes; otherwise, it fails.
This is particularly useful when refactoring or making changes to existing components, as snapshot tests can catch regressions in the component’s output.
Types of Test Cases
Unit Tests: Focus on testing individual components or functions in isolation. This is crucial for ensuring that each part of your application works as expected under controlled conditions.
Component Testing (Snapshot tests, prop and state changes, lifecycle methods)
Logic and Utility Testing (Pure functions, utility functions, business logic)
Integration Tests: Test how different parts of your application work together. This could involve testing the integration between components or between components and external services.
Component Integration Testing (Testing interactions between parent and child components)
Redux and State Management Testing (Action creators, reducers, selectors, and integration with components)
Snapshot Tests: As mentioned earlier, snapshot tests allow you to compare the current output of your components against a previously saved snapshot. This is particularly useful for catching unexpected changes in the UI.
End-to-End (E2E) Tests: These tests simulate real user scenarios across the entire application. E2E testing is essential for ensuring that your application works seamlessly from start to finish.
In today’s mobile-centric world, having a seamless user experience across different platforms and channels is crucial. Dynamic linking, also known as deep linking, is a powerful technique that allows you to create a seamless transition between your app and other apps or websites. It enables you to send users directly to specific content or activities within your app, providing a more engaging and contextual experience.
What is Dynamic Linking?
Dynamic linking is the process of creating a link that launches a specific part of your app, rather than just opening the app’s main screen. This is particularly useful when you want to direct users to a specific product page, a specific piece of content, or a specific feature within your app.
Benefits of Dynamic Linking
Improved User Experience: Dynamic linking provides a more seamless and intuitive user experience by taking users directly to the desired content or feature within your app.
Better Engagement: By making it easier for users to access specific content or features, dynamic linking can increase user engagement and retention.
Enhanced Discoverability: Dynamic links can be shared across various platforms, such as websites, social media, and messaging apps, making it easier for users to discover and access your app’s content.
Better Attribution: Dynamic links can help you track the sources of your app installs and user engagement, enabling you to optimize your marketing efforts more effectively.
Implementing Dynamic Linking for Android
For Android, you can use Firebase Dynamic Links or App Links from the Android Developer Documentation. Both technologies allow you to create deep links that can launch specific content or activities within your app.
App Links (Android)
App Links is a feature provided by the Android platform that allows you to associate specific web URLs with specific content or activities within your app. Here’s a high-level overview of the steps involved:
Associate Web URLs with App Content: Define the mapping between specific web URLs and the corresponding content or activities within your app.
Handle Incoming Links: Implement the necessary code to handle incoming links and navigate users to the appropriate content or activity within your app.
Android App Links is a feature available on Android 6.0 (API level 23) and newer versions. It allows apps to designate themselves as the default handler for certain types of web links that use the HTTP and HTTPS schemes.
This streamlines the experience for users when clicking on links that should open in a specific app. Instead of being prompted to pick an app, the intended app launches right away.
How to Set Up Universal Link?
Step 1: Set Up Intent Filters
First, define the intent filters in your Android manifest file (android/app/src/main/AndroidManifest.xml). These filters specify which URLs your app can handle.
Create a assetlinks.json file and host it on your website at https://www.example.com/.well-known/assetlinks.json. Here is sample file format.
{
"applinks": {
"details": [
{
"appIDs": [ "ABCDE12345.com.example.app", "ABCDE12345.com.example.app2" ],
"components": [
{
"#": "no_universal_links",
"exclude": true,
"comment": "Matches any URL with a fragment that equals no_universal_links and instructs the system not to open it as a universal link."
},
{
"/": "/buy/*",
"comment": "Matches any URL with a path that starts with /buy/."
},
{
"/": "/help/website/*",
"exclude": true,
"comment": "Matches any URL with a path that starts with /help/website/ and instructs the system not to open it as a universal link."
},
{
"/": "/help/*",
"?": { "articleNumber": "????" },
"comment": "Matches any URL with a path that starts with /help/ and that has a query item with name 'articleNumber' and a value of exactly four characters."
}
]
}
]
},
"webcredentials": {
"apps": [ "ABCDE12345.com.example.app" ]
},


"appclips": {
"apps": ["ABCDE12345.com.example.MyApp.Clip"]
}
}
Step3. Test Your Implementation: Ensure that your links open your app correctly and that users without the app are redirected to your website seamlessly.
Implementing Dynamic Linking for iOS
Universal Links
Universal Links is a feature provided by Apple that allows you to associate specific web URLs with specific content or activities within your app. Here’s a high-level overview of the steps involved:
Configure Universal Links: Follow the official Apple documentation to configure Universal Links in your iOS project.
Associate Web URLs with App Content: Define the mapping between specific web URLs and the corresponding content or activities within your app.
Handle Incoming Links: Implement the necessary code to handle incoming links and navigate users to the appropriate content or activity within your app.
Steps to Implement Universal Links
1. Adjust iOS Build Settings
Launch Xcode
Open Xcode.
Open the ios/AppName.xcworkspace file inside your project’s ios folder.
Add the <AppName>DeepLinkingEnabled Key Value Pair
In the Xcode Navigator, expand AppName and click Info.
In the Editor, Control-click and select Raw Keys and Values from the context menu.
Control-click again and select Add Row.
Set the new key properties as follows:
Key: <AppName>DeepLinkingEnabled
Type: Boolean
Value: YES
2. Add Associated Domains
Launch Xcode and Configure Associated Domains
Open Xcode if necessary.
Click the top-level Runner.
In the Editor, select the Runner target.
Click Signing & Capabilities.
Click + Capability under Signing & Capabilities and select Associated Domains.
In the Associated Domains section, click + and enter applinks:<web domain>, replacing <web domain> with your own domain name.
3. Associate Your App with Your Web Domain
You need to host an apple-app-site-association file in your web domain. This file tells the mobile browser which iOS application to open instead of the browser.
Locate Components of the App ID
Apple formats the app ID as <team id>.<bundle id>.
Locate the bundle ID in the Xcode project.
Locate the team ID in the developer account.
For example, with a team ID of S8QB4VV633 and a bundle ID of com.example.deeplinkCookbook, the app ID would be S8QB4VV633.com.example.deeplinkCookbook.
Create and Host apple-app-site-association JSON File
Create a JSON file with the following structure, adjusting the app ID as necessary:
Host the file at the following URL structure: <webdomain>/.well-known/apple-app-site-association.
Ensure that your browser can access this file.
4. Test the Universal Link
Test a universal link using a physical iOS device or the Simulator. Note that it might take up to 24 hours for Apple’s Content Delivery Network (CDN) to request the apple-app-site-association (AASA) file from your web domain. To bypass Apple’s CDN, use the developer keyword like this
applinks:developer.example.com
Testing on Physical iOS Device
Launch the Notes app.
Type the URL in the Notes app.
Click the resulting link.
For iOS, you can use Universal Links or Branch.io. Both technologies allow you to create deep links that can launch specific content or activities within your app.
Best Practices
When implementing dynamic linking, it’s important to follow best practices to ensure a seamless user experience:
Test Thoroughly: Thoroughly test your dynamic links across different platforms, devices, and scenarios to ensure they work as expected.
Provide Fallback Options: If a user doesn’t have your app installed, provide fallback options, such as redirecting them to the app store or a mobile-friendly website.
Track and Analyze: Use analytics tools to track and analyze the performance of your dynamic links, and make data-driven decisions to optimize your implementation.
Keep Up-to-Date: Stay updated with the latest changes and updates to the dynamic linking technologies you’re using, as they may introduce new features or modifications to existing ones.
Sustainable Tech Solutions & Cyber Security represent two critical aspects of modern-day challenges and innovations. Let’s delve into each of these topics individually before exploring their intersection:
Sustainable Tech Solutions:
Renewable Energy: The adoption of renewable energy sources like solar, wind, and hydroelectric power is a cornerstone of sustainable technology solutions. These sources produce minimal greenhouse gas emissions compared to traditional fossil fuels, thus mitigating climate change.
Energy Efficiency: Sustainable technology focuses on developing energy-efficient solutions across various sectors, including transportation, buildings, and manufacturing. This involves the use of smart systems, energy-efficient appliances, and optimized processes to reduce energy consumption.
Circular Economy: Embracing a circular economy model involves designing products and systems that prioritize resource conservation, reuse, and recycling. This approach aims to minimize waste generation and promote the sustainable use of materials throughout their lifecycle.
Green Infrastructure: Sustainable technology solutions also encompass the development of green infrastructure, such as green buildings, eco-friendly transportation systems, and sustainable urban planning practices. These initiatives aim to reduce environmental impact while enhancing the overall quality of life.
Clean Technologies: Clean technologies encompass a wide range of innovations aimed at reducing pollution and environmental degradation. This includes technologies for air and water purification, waste management, and soil remediation, among others.
Blockchain for Sustainability: Blockchain technology offers opportunities to enhance transparency and traceability in supply chains, facilitating sustainable practices such as fair trade and responsible sourcing. Implementing robust cybersecurity measures in blockchain networks is essential to safeguard against data breaches and tampering.
Cyber Security:
Threat Landscape: The cyber threat landscape is constantly evolving, with adversaries employing increasingly sophisticated techniques to compromise systems, steal data, and disrupt operations. Understanding the nature of these threats is essential for developing effective cybersecurity solutions.
Security Measures: Cybersecurity measures encompass a variety of techniques and technologies designed to protect digital assets from unauthorized access, data breaches, and cyber-attacks. This includes measures such as encryption, access controls, firewalls, intrusion detection systems, and antivirus software.
Risk Management: Effective cybersecurity involves assessing and managing risks to digital assets and systems. This includes identifying potential vulnerabilities, implementing controls to mitigate risks, and developing incident response plans to address security breaches when they occur.
Compliance and Regulations: Compliance with industry regulations and cybersecurity standards is essential for organizations to protect sensitive data and maintain the trust of their customers and stakeholders. This includes regulations such as GDPR, HIPAA, PCI DSS, and industry-specific standards.
Cybersecurity Awareness: Cybersecurity awareness and training programs are critical for educating employees and end-users about best practices for protecting against cyber threats. This includes training on how to recognize phishing attempts, use secure passwords, and safeguard sensitive information.
Artificial Intelligence (AI) in Cybersecurity: AI-powered cybersecurity solutions provide advanced threat detection and response capabilities, enabling organizations to identify and mitigate cyber threats more effectively. However, ensuring the ethical use of AI and addressing potential biases in algorithms are essential considerations in cybersecurity implementation.
Cybersecurity in Critical Infrastructure: Protecting critical infrastructure, such as power grids, transportation systems, and healthcare facilities, from cyber threats is paramount to ensure public safety and national security. Collaborative efforts between government agencies, private sector stakeholders, and cybersecurity experts are essential to strengthen the resilience of critical infrastructure against cyber-attacks.
Intersection of Sustainable Tech Solutions & Cyber Security:
The intersection of sustainable tech solutions and cybersecurity highlights the importance of integrating security considerations into the design and implementation of environmentally friendly technologies. This involves:
Secure Development Practices: Implementing secure coding practices and conducting thorough security assessments during the development of sustainable technology solutions to mitigate potential cyber threats.
Data Privacy and Protection: Ensuring the privacy and security of data collected by sustainable tech solutions, such as smart grid systems or IoT-enabled environmental monitoring devices, to prevent unauthorized access or misuse.
Resilience and Continuity: Building resilience into sustainable infrastructure to withstand cyber-attacks and other disruptions, ensuring continued operation and minimal environmental impact.
Cybersecurity for Clean Technologies: Recognizing the cybersecurity implications of clean technologies, such as renewable energy grids or electric vehicle charging networks and implementing appropriate security measures to safeguard these critical systems.
In summary, addressing the intersection of sustainable tech solutions and cybersecurity requires a holistic approach that considers both environmental and security concerns to create resilient, secure, and environmentally friendly technology solutions.
Cyber security tools used in social cyber security:
ZeroFOX: ZeroFOX is a social media and digital security platform that helps organizations protect their social media accounts from cyber threats, including phishing attacks, malware distribution, and account hijacking. It provides real-time monitoring, threat intelligence, and automated remediation.
Social-Engineer Toolkit (SET): The Social-Engineer Toolkit is an open-source penetration testing framework designed specifically for social engineering attacks. It includes various attack vectors, such as spear-phishing emails, malicious websites, and credential harvesting techniques.
BrandWatch: BrandWatch is a social media monitoring and analytics tool that helps organizations track mentions of their brand, products, or keywords across various social media platforms. It provides insights into consumer sentiment, trends, and competitive intelligence.
About Kali Linux
Kali Linux stands out as a leading cybersecurity tool, revered for its comprehensive suite of over 300 security auditing tools. As an operating system tailored specifically for security professionals and enthusiasts, it offers a versatile platform for network and system vulnerability assessment. What makes Kali Linux particularly appealing is its accessibility to users of varying cybersecurity expertise levels. Even beginners can navigate its tools effectively, thanks to its user-friendly interface and extensive documentation.
With Kali Linux, organizations gain access to a wide array of tools designed for network scanning, penetration testing, forensics, and much more. Its arsenal includes tools for discovering and exploiting vulnerabilities, testing network defenses, and analyzing security incidents. Moreover, Kali Linux simplifies the process of security monitoring and management with its intuitive interface and executable tools, allowing users to safeguard their systems with ease.
One of the standout features of Kali Linux is its availability, as it can be easily downloaded and deployed for use. Whether it’s a cybersecurity professional conducting in-depth security assessments or a beginner exploring the world of ethical hacking, Kali Linux provides the necessary tools and resources to enhance cybersecurity posture and mitigate risks effectively.
BeEF, or The Browser Exploitation Framework, is a powerful tool used in penetration testing to assess the security vulnerabilities of web browsers. In a digital landscape where web-based attacks are increasingly prevalent, BeEF provides a unique perspective by focusing on client-side vulnerabilities.
Rather than targeting traditional network perimeters or system defenses, BeEF delves into the vulnerabilities inherent in web browsers themselves. By leveraging client-side attack vectors, it allows penetration testers to evaluate the true security posture of a target environment.
BeEF works by hooking into one or more web browsers, effectively turning them into entry points for launching directed command modules and other attacks from within the browser’s context. This approach provides insights into the potential risks posed by web-based vulnerabilities and helps organizations bolster their defenses accordingly.
Overall, BeEF is a valuable tool for security professionals seeking to comprehensively assess and fortify the security of web applications and environments against emerging threats.
Getting Started with BEEF how to setup and use
Disclaimer: all the information available in this post is for educational purposes, it doesn’t have any intention to harm someone.
Step 1.
To get started with the Beef you have to install it first. The installation source code is freely available the beef is written in Ruby language. You need to set up the development environment for the ruby. After that just start the server of the beef tool using the command ./beef within the beef code directory.
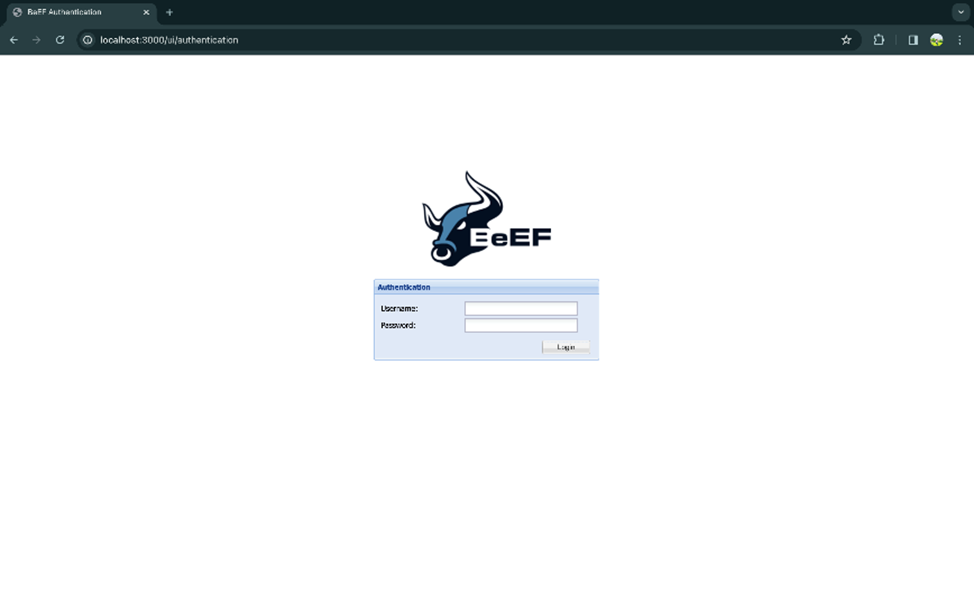
Step 2.
Once the beef is started go to http://localhost:3000 in you browser you will be able to see the browser UI. Here you have to login using the username and password. By default the username and password is beef. You can change this in config.yaml file.
Step 3.
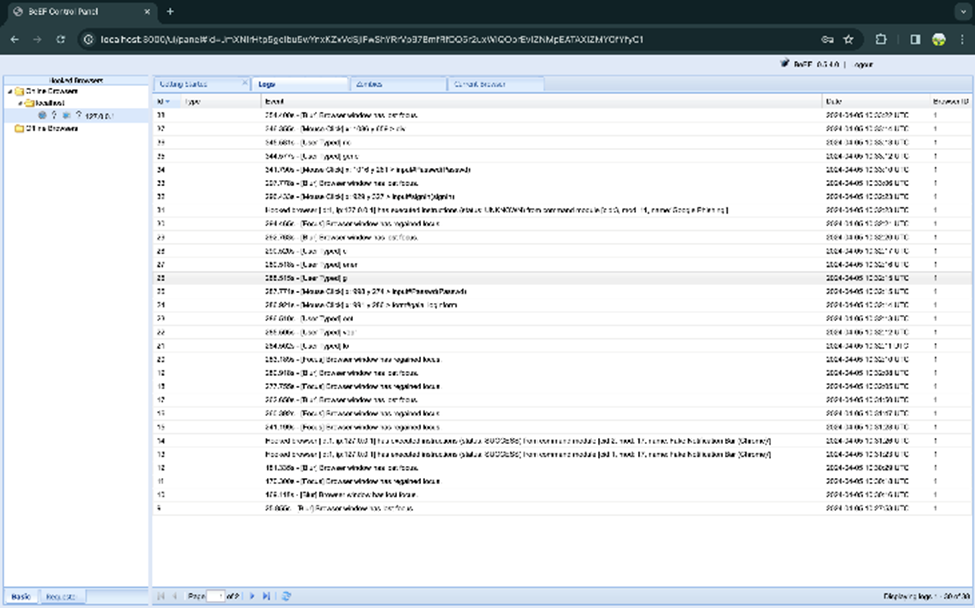
After login you will be able to see the page like this here same attack links are already given you can use them for target client. If you send the link and when the client click on the link you will get the access of their browser now you can perform the required attack on client.
Step 4.
Here you will be able to see user browser history and other information in the log. In the logs you will be able to see all the action client is performing.
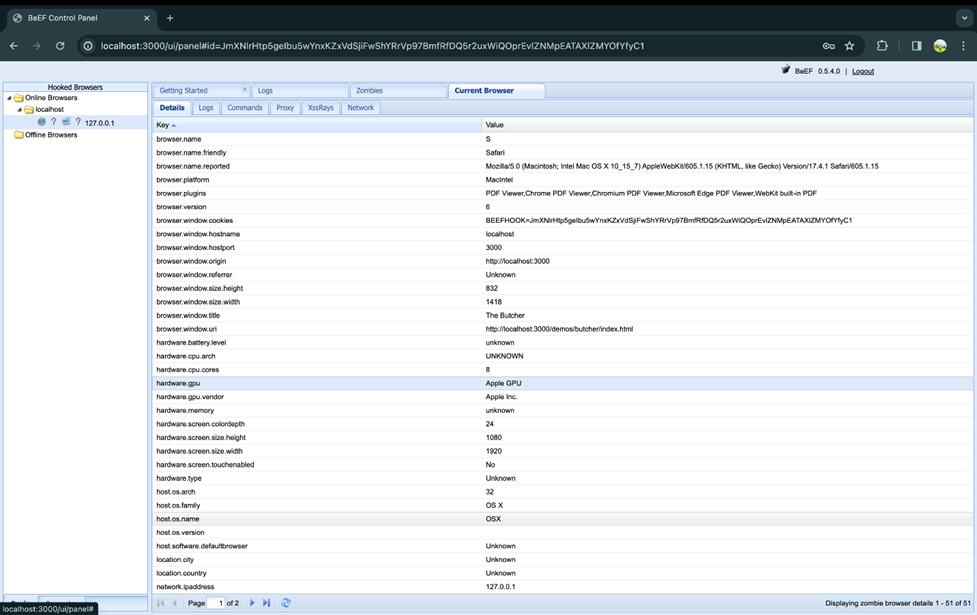
You can also see the device information of the target client.
How google phishing attack works in beef.
Here you will able to see a number of phishing attacks are available let suppose we choose a Google Phishing in this case it show the page same as google login when the client enter their credentials to login you will be able to see their credentials also the user will get logged-In, Even the user will not be able to identified that his username and password is shared.
Except this there are multiple type of attacks are possibe using the BEEF tool. Even the attacker can generate a QR code to share to the target client. When the client scans the QR code, the attacker will get control over the client browser.
Rust is a systems programming language that has gained significant popularity in recent years due to its focus on performance, safety, and concurrency. In 2006, the software developer, Graydon Hoare, started Rust as a personal project while he was working at Mozilla.
What is Rust for?
Rust is designed for systems programming, which involves writing software that interacts directly with hardware, operating systems, or low-level components.
It is particularly well-suited for developing: Operating systems and kernels, Device drivers, Virtual machines, Web browsers, Game engines, Distributed systems, Embedded systems etc.
What is Rust used for?
Rust is used in a wide range of applications and projects, including:
Mozilla’s Servo web browser engine and various components of the Firefox web browser
The Deno JavaScript/TypeScript runtime
The Redox operating system
The Tor network’s core networking component
Dropbox’s Infinity Cache engine
Cloudflare’s workers and other infrastructure components
Game engines like Amethyst and Veloren
Why is Rust getting so popular?
Rust has gained popularity for several reasons:
Memory Safety: Rust eliminates entire categories of memory-related bugs, such as null pointer dereferences, buffer overflows, and data races, without needing a garbage collector. This makes Rust an attractive choice for developing secure and robust systems.
Performance: Rust provides performance comparable to low-level languages like C and C++, making it suitable for performance-critical applications.
Concurrency: Rust’s ownership model and type system make it easier to write safe concurrent code, a crucial aspect in today’s multi-core and distributed systems.
Abstraction and Productivity: Despite its low-level focus, Rust provides high-level abstractions and modern language features that improve developer productivity, such as algebraic data types, pattern matching, and functional programming constructs.
Ecosystem and Community: Rust has a growing and vibrant community, with a rich ecosystem of libraries, tools, and resources. This fosters collaboration, knowledge sharing, and ongoing development.
Open Source:
Rust is an open-source project sponsored by Mozilla Research, ensuring transparency and community involvement in its development.
Cross-Platform: Rust code can compile and run on various platforms, including Windows, Linux, macOS, and embedded systems like ARM and RISC-V.
Tooling: Rust provides excellent tooling, including an integrated package manager (Cargo), a powerful build system, and robust documentation tools.
Adoption: Major companies and organizations, such as AWS, Microsoft, Google, Dropbox, and Mozilla, have adopted Rust for various projects, contributing to its growth and adoption.
Comparison of Rust with some other popular programming languages:
Rust vs. C/C++:
Addressing memory safety issues that often lead to vulnerabilities in C/C++ programs.
Rust provides automatic memory management through its ownership and borrowing concepts, eliminating the need for manual memory management and reducing the risk of common memory-related bugs like null pointer dereferences, data races, and buffer overflows.
Rust has a more modern syntax and incorporates features from functional programming languages, making it more expressive and easier to write safe concurrent code.
Performance-wise, Rust can match or even outperform C/C++ in many scenarios due to its lack of runtime overhead and efficient compiler optimizations.
Rust vs. Go:
Both Rust and Go are designed for systems programming and can be used for similar domains like operating systems, network services, and low-level applications.
Rust has a more complex type system and follows a more traditional object-oriented programming paradigm, while Go favors simplicity and a lightweight approach.
Rust’s ownership model and borrow checker provide stronger memory safety guarantees compared to Go’s garbage collector.
Go’s concurrency model, based on goroutines and channels, is often considered more straightforward than Rust’s approach, which uses lightweight threads and message passing.
Rust’s performance is generally considered better than Go for CPU-bound tasks, while Go’s performance is often better for I/O-bound workloads.
Rust vs. Java/C#:
Rust is a systems programming language designed for low-level programming, while Java and C# are primarily used for application development and have a managed runtime environment.
Rust offers better control over memory management and low-level system resources, making it suitable for performance-critical applications and systems programming tasks.
Java and C# have more extensive standard libraries and tooling ecosystems, which can make development more productive for certain application domains.
Rust’s ownership model and borrowing rules can be more challenging to learn compared to the garbage collection mechanisms in Java and C#.
Rust vs. Python/JavaScript:
Rust is a statically typed, compiled language focused on performance and system-level programming, while Python and JavaScript are dynamically typed, interpreted languages primarily used for scripting and web development.
Rust offers better performance and control over low-level details, making it suitable for tasks like game development, operating systems, and high-performance computing.
Python and JavaScript have simpler syntax and are generally easier to learn and prototype with, but they may not be as suitable for performance-critical or resource-constrained environments.
Rust’s type system and ownership rules provide stronger guarantees about program behavior and memory safety compared to Python and JavaScript.
Steep learning curve, especially for the ownership model and borrowing rules
Relatively young ecosystem compared to more established languages
Limited support for certain domains or libraries compared to more mature languages
Future of Rust:
Rust is poised to become a dominant language in areas where performance and safety are critical, such as embedded software, OS kernels/drivers, system libraries, and performance-critical software like games and browsers2. Additionally, Rust’s potential for integration with .NET, authoring of COM/UWP, use of GUI frameworks, and mixed-mode debugging could make it a compelling choice for Windows systems programming.
However, it’s important to note that Rust’s steep learning curve and limited applicability for some applications, such as web development, may hinder its widespread adoption. Nevertheless, the Rust ecosystem is growing rapidly, and its potential for integration with existing technologies and its unique approach to memory safety make it an exciting language to watch in the coming years.
Conclusion: Rust’s unique combination of performance, safety, concurrency, and productivity has made it an attractive choice for systems programming and other domains where these factors are crucial. As the demand for secure, efficient, and concurrent software continues to grow, Rust’s popularity is likely to increase further.
Join the waitlist
Be first to reclaim your space.
Leave your details and we'll email you the moment Nix is ready to download.