Categories
Technology

Redis

What is Redis?

Redis is an open-source, in-memory data structure store that may be used as a database, cache, or message broker. It supports several data structures including strings, hashes, lists, sets, sorted sets, bitmaps, hyper loglogs, and geospatial indexes. Redis is characterized by its performance, simplicity, and versatility.

Key Features of Redis

  • In-Memory Data Store: Held in memory, with ultra-fast read and write operations.
  • Persistence: Offers methods such as snapshotting and append-only file (AOF).
  • Data Structures: Supports strings, hashes, lists, sets, sorted sets, bitmaps, and more.
  • Pub/Sub Messaging: Allows for real-time messaging and notifications.
  • High Availability: Implements Redis Sentinel for monitoring and fail-over.
  • Cluster Support: Goes all the way towards data distribution across multiple nodes with Redis Cluster.
  • Extensibility: Provides for modules of custom commands and functionality.
  • Lua Scripting: Can execute Lua scripts natively on the server. Atomic Operations: Commands like increment, decrement, and list operations are atomic in nature.
  • Replication: Provides for master-slave replication, thus making sure data is not lost in case of failure, which can easily scale to higher data.

Uses of Redis

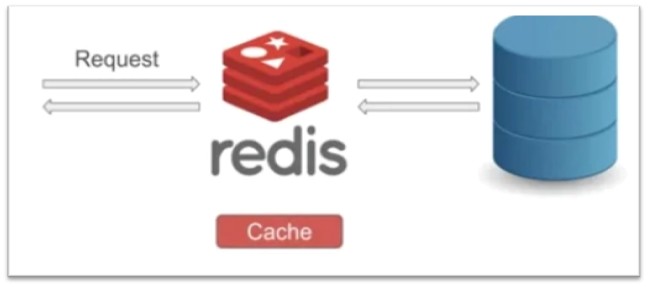
  • Caching: Stores frequently accessed data to decrease database load and latency.
  • Session Management: User sessions in web applications can be managed.
  • Real-time Analytics: It is capable of handling real-time data streams like user activity or stock prices tracking.
  • Leaderboards: This helps to build a real-time ranking system by making use of sorted sets.
  • Message Queues: This can act as a lightweight message broker.
  • Geospatial Indexing: It stores and queries geospatial data in an efficient way.
  • Pub/Sub Systems: One can use this to build a chat application, notification, or live feeds.
  • Machine Learning: Serve pre-computed ML models and features.
  • Gaming Applications: Manage game states, leaderboards, and matchmaking.

How to Implement Redis

1. Installation

  • Linux: Use apt-get install redis or yum install redis.
  • macOS: Install via Homebrew: brew install redis.
  • Windows: Use WSL or download from third-party Redis for Windows projects.

2. Basic Commands

  • Start Redis server: redis-server
  • Connect using the CLI: redis-cli
  • Common commands:
    a) SET key value: Set a value.
    b) GET key: Retrieve a value.
    c) DEL key: Delete a key.
    d) EXPIRE key seconds: Set expiration time.
    e) INCR key: Increment value

3. Config

Modify the redis.conf configuration for parameters, such as Persistence: Persist to AOF by append only yes. Security: Add a password using the requirepass. Max Memory: Specify limitations with max memory and eviction strategies. Log: Configure levels and logfiles.

4. Client libraries Redis supports many client libraries in multiple languages such as Python (redis-py), Node.js (ioredis), Java (Jedis), and PHP (Predis or phpredis).

Redis in Laravel Framework

Redis is neatly supported in Laravel because Laravel supports Redis out of the box.

  1. Prerequisites

Install Redis on your system and ensure that Redis is running.

2. Installation of PHP Redis Extension

You can install the PHP Redis extension by using the following command: Linux/macOS: pecl install redis Windows: Copy the Redis DLL to the PHP extensions folder and uncomment it in php.ini.

3. Laravel Configuration

Add Redis to the config/database.php file:

'redis' => [

 'client' => env('REDIS_CLIENT', 'phpredis'),

 'default' => [

'host' => env('REDIS_HOST', '127.0.0.1'),

'password' => env('REDIS_PASSWORD', null),

'port' => env('REDIS_PORT', 6379),

'database' => env('REDIS_DB', 0),

 ],

'cache' => [

 'host' => env('REDIS_HOST', '127.0.0.1'),

 'password' => env('REDIS_PASSWORD', null),

 'port' => env('REDIS_PORT', 6379),

 'database' => env('REDIS_CACHE_DB', 1),

 ],

 ],

Update the .env file:

  • REDIS_CLIENT=phpredis
  • REDIS_HOST=127.0.0.1
  • REDIS_PASSWORD=null
  • REDIS_PORT=6379
  • REDIS_DB=0
  • REDIS_CACHE_DB=1

Usage in Laravel

Caching:

  • Cache::store(‘redis’)->put(‘key’, ‘value’, 3600); // Store in cache
  • Cache::store(‘redis’)->get(‘key’); // Retrieve from cache
  • Session Storage: Update SESSION_DRIVER in.env to redis.
  • Queues: Set QUEUE_CONNECTION to redis in.env.
  • Broadcasting: Configure Redis as a broadcasting driver to implement real-time notifications.

Best Practices with Redis

  1. Monitor Usage: Use redis-cli or tools like RedisInsight.
  2. Set Expiration: Employ EXPIRE or TTL to stop uncontrolled growth.
  3. Utilize Namespaces: Use the keys with prefix to better arrange.
  4. Use Redis Cluster: Scale up to handle large-sized applications.

Secure Redis:

  • Make use of secure passwords
  • Redis bind only on specific IP.
  • Activate TLS.
  • Back up the server: Snapshotting or AOF should be turned on.
  • Minimize abuse: Redis can only be utilized when data stored needs in-memory speeds.
  • Code Efficiency: Implement Lua script codes for extensive computations.
  • Optimized Eviction: Select an appropriate eviction policy for eviction such as volatile-lru, allkeys-lru etc.

Tools and Libraries

  1. RedisInsight- GUI management for Redis
  2. Predis: a PHP extension allowing interaction with Redis
  3. Redis Modules:
    a) RedisJSON : Json support
    b) RediSearch : Full text Search
    c) RedisTimeSeries: manage time-series data
    d) RedisBloom : Probabilistic Data Structures
    e) Redis Sentinel- provide high availability for Redis applications automatically
    f) RedisGraph: Redis’ graph database.

Connect with Redis client API libraries:

Use the Redis client libraries to connect to Redis servers from your own code. Following client libraries for six main languages:

LanguageClient nameDocs
Pythonredis-pyredis-py guide
PythonRedisVLRedisVL guide
C#/.NETNRedisStackNRedisStack guide
JavaScriptnode-redisnode-redis guide
JavaJedisJedis guide
JavaLettuceLettuce guide
Gogo-redisgo-redis guide
PHPPredisPredis guide

Community-supported clients 

The table below shows the recommended third-party client libraries for languages that Redis does not document directly:

LanguageClient nameGithubDocs
Chiredishttps://github.com/redis/hiredishttps://github.com/redis/hiredis
C++Boost.Redishttps://github.com/boostorg/redishttps://www.boost.org/doc/libs/develop/libs/redis/doc/html/index.html
Dartredis_dart_linkhttps://github.com/toolsetlink/redis_dart_linkhttps://github.com/toolsetlink/redis_dart_link
PHPPhpRedis extensionhttps://github.com/phpredis/phpredishttps://github.com/phpredis/phpredis/blob/develop/README.md
Rubyredis-rbhttps://github.com/redis/redis-rbhttps://rubydoc.info/gems/redis
Rustredis-rshttps://github.com/redis-rs/redis-rshttps://docs.rs/redis/latest/redis/

redis-py guide (Python)

Connect your Python application to a Redis database

redis-py is the Python client for Redis. The sections below explain how to install redis-py and connect your application to a Redis database.

redis-py requires a running Redis or Redis Stack server. See Getting started for Redis installation instructions. You can also access Redis with an object-mapping client interface.

Install

To install redis-py, enter:

pip install redis

For faster performance, install Redis with hiredis support. This provides a compiled response parser, and for most cases requires zero code changes. By default, if hiredis >= 1.0 is available, redis-py attempts to use it for response parsing.

pip install redis[hiredis]

Connect and test

Connect to localhost on port 6379, set a value in Redis, and retrieve it. All responses are returned as bytes in Python. To receive decoded strings, set decode_responses=True. For more connection options, see these examples.

r = redis.Redis(host='localhost', port=6379, decode_responses=True)

Store and retrieve a simple string.

r.set('foo', 'bar')
# True
r.get('foo')

# bar

Store and retrieve a dict.

r.hset('user-session:123', mapping={
    'name': 'John',
    "surname": 'Smith',
    "company": 'Redis',
    "age": 29
})
# True

r.hgetall('user-session:123')
# {'surname': 'Smith', 'name': 'John', 'company': 'Redis', 'age': '29'}

Redis is a powerful and versatile tool for all kinds of use cases, from caching to real-time analytics. With its increasing feature set and community support, Redis remains a critical component of modern application architecture. Its flexibility and performance make it an essential technology for developers who want to build scalable, high-performance applications.

References:
https://dev.to/woovi/simple-cache-with-redis-5g3a
https://laravel.com/docs/11.x/redis
https://redis.io/docs/latest/develop/clients/
https://redis.io/ebook/part-1-getting-started/chapter-1-getting-to-kn…

Categories
Technology

WebRTC Demystified: Concepts, Applications, and Implementation

WebRTC Demystified: Concepts, Applications, and Implementation

In today’s digital age, real-time communication has become an integral part of our online experience. Whether you’re on a video call with colleagues, streaming live content, or playing multiplayer games, there’s a good chance you’re using WebRTC technology. Let’s dive deep into what WebRTC is, how it works, and how you can implement it in your applications.

What is WebRTC?

Web Real-Time Communication (WebRTC) is a revolutionary open-source technology that enables direct peer-to-peer communication between web browsers without requiring plugins or third-party software. It’s the technology powering many popular video communication platforms like Google Meet and countless other applications that require real-time audio, video, or data sharing. It ported by all major browsers like Chrome, Firefox, Safari, and Edge, WebRTC provides APIs for audio, video, and data sharing.

Core Features of WebRTC

Peer-to-Peer Communication: Directly connects users, bypassing the need for central servers for media streaming.

Cross-Platform Support: Works seamlessly across web browsers, mobile apps, and embedded systems.

Secure Communication: Uses DTLS (Datagram Transport Layer Security) and SRTP (Secure Real-time Transport Protocol) for encrypted data transmission.

Low Latency: Designed for real-time communication, ensuring minimal delay.

Core Components of WebRTC

  1. RTCPeerConnection: The RTCPeerConnection is the foundation of WebRTC communication. Think of it as a virtual phone line between two peers, handling all aspects of the connection:
  2. Media stream transmission Connection establishment and maintenance Automatic bandwidth adjustments Signal processing and noise reduction
  3. RTCDataChannel: While many associate WebRTC with audio/video calls, it also provides a powerful data channel for sending arbitrary information between peers. This enables:
  4. Text chat functionality File sharing Game state synchronization Real-time collaborative features
  5. GetUserMedia API: Accesses the user’s camera and microphone.


Applications of WebRTC

WebRTC’s versatility makes it suitable for various use cases, including:

1. Video and Voice Calling
The most common application of WebRTC is video and audio calling. Platforms like Google Meet, Microsoft Teams, and Zoom leverage WebRTC to provide high-quality communication experiences.

2. Online Gaming
Real-time gaming requires low-latency data transfer, making WebRTC’s RTCDataChannel a perfect fit for multiplayer games and live gaming sessions.

3. Live Streaming
WebRTC is used for low-latency live streaming in apps like Periscope and some social media platforms.

4. Remote Collaboration Tools
From screen sharing to collaborative document editing, WebRTC facilitates real-time interactions for remote work and learning.

5. IoT Applications
WebRTC enables real-time communication between IoT devices for tasks such as remote monitoring and control.

How WebRTC Works
At its core, WebRTC establishes peer-to-peer connections through three main steps:

1. Signaling

Signaling is the process of exchanging connection metadata (like IP addresses) between peers. This is often done using a server over protocols like WebSockets. The signaling server is only required for the initial connection setup.

Before two peers can communicate, they need to exchange some initial information. This happens through a process called signaling:

  • The initiating peer creates an “offer”
  • The receiving peer responds with an “answer”
  • Both peers exchange network information (ICE candidates)

This exchange happens through a signaling server, which acts as an intermediary but doesn’t handle the actual media streams.

2. NAT Traversal with STUN and TURN

Using the Session Description Protocol (SDP), peers exchange information about supported codecs, resolution, and other media parameters.

  • One of the biggest challenges in peer-to-peer communication is establishing connections through firewalls and NATs. WebRTC handles this using: STUN (Session Traversal Utilities for NAT)
  • NAT Traversal with STUN and TURN Helps peers discover their public IP addresses Essential for establishing direct connections Relatively lightweight and inexpensive to operate
    • TURN (Traversal Using Relays around NAT) Acts as a fallback when direct connections aren’t possible Relays traffic between peers More resource-intensive but ensures connectivity

3. Peer-to-Peer Connection
Once signaling is complete, WebRTC uses ICE (Interactive Connectivity Establishment) to discover the best network path for data transfer. Media and data are then exchanged directly between peers using SRTP and SCTP (Stream Control Transmission Protocol).

Collects all potential connection paths (ICE candidates) Tests each path to find the optimal route Manages the connection process from start to finish

Implementing WebRTC:
A Basic Example Here’s a simplified example of implementing a WebRTC connection:

// Create peer connection

const peerConnection = new RTCPeerConnection();

peerConnection.onicecandidate = event => {

    if (event.candidate) {

        // Send candidate to remote peer via signaling server

        signalingChannel.send(JSON.stringify({

            type: 'candidate',

            candidate: event.candidate

        }));

    }

};

// Create and send offer

async function makeCall() {

    const offer = await peerConnection.createOffer();

    await peerConnection.setLocalDescription(offer);

    signalingChannel.send(JSON.stringify({

        type: 'offer',

        offer: offer

    }));

}

// Handle incoming media streams

peerConnection.ontrack = event => {

    const remoteStream = event.streams[0];

    // Display the remote stream in your UI

    remoteVideo.srcObject = remoteStream;

};

Best Practices for WebRTC Implementation

1. Connection Reliability

  • Always implement TURN server fallback
  • Handle network changes gracefully
  • Monitor connection quality

2. Security Considerations

  • Use secure signaling channels (WSS)
  • Implement proper user authentication
  • Encrypt data channels when handling sensitive information

3. Performance Optimization

  • Implement adaptive bitrate streaming
  • Use appropriate video codecs
  • Monitor and optimize bandwidth usage


    Challenges and Considerations

    While WebRTC is powerful, it comes with its own set of challenges:
  1. Scalability

    P2P connections become resource-intensive with multiple users May require media servers for large-scale applications

2. Browser Compatibility

  • Different browsers may implement features differently
  • Need for fallback solutions

3. Network Conditions

  • Variable connection quality
  • Bandwidth limitations
  • Firewall restrictions

The Future of WebRTC

WebRTC continues to evolve with new features and improvements:

  • Better codec support
  • Enhanced performance
  • Improved mobile support
  • Integration with emerging technologies

Conclusion

WebRTC has transformed the landscape of real-time communication on the web. Its open-source nature, robust features, and growing support make it an excellent choice for building real-time applications. Whether you’re developing a video chat application, a collaborative tool, or a gaming platform, understanding WebRTC’s concepts and implementation details is crucial for creating successful real-time applications. By following best practices and staying updated with the latest developments, you can leverage WebRTC to create powerful, real-time experiences for your users. The technology continues to evolve, and its future looks promising as more applications adopt peer-to-peer communication capabilities.

References:

Categories
Technology

Internationalization and Localization in React Native

Internationalization and Localization in React Native

In today’s global marketplace, creating apps that can reach users worldwide isn’t just a luxury—it’s a necessity. Internationalization (i18n) and Localization (l10n) are crucial steps in making your React Native app accessible to users across different languages and regions. This guide will walk you through implementing these features effectively in your React Native applications.

Understanding i18n and l10n

What is Internationalization (i18n)?

Internationalization is the process of designing and preparing your app to be adapted to different languages and regions. This involves:

  • Extracting text content from your code
  • Handling different date formats
  • Managing number formatting
  • Supporting right-to-left (RTL) languages
  • Adapting to various cultural preferences

What is Localization (l10n)?

Localization is the actual process of adapting your app for a specific locale or region, including:

  • Translating text content
  • Adjusting images and colors for cultural appropriateness
  • Modifying content to match local preferences
  • Ensuring proper currency and measurement unit display

Why it Matters

In today’s globalized world, mobile applications are used by a diverse audience across different countries and cultures. Internationalization and localization ensure that apps provide a seamless and personalized user experience, regardless of the user’s language or region. Here are the key reasons why it is essential:

  • Reaching a Global Audience: With mobile apps being used worldwide, supporting multiple languages ensures you can cater to a broader user base, breaking down language barriers.
  • Enhanced User Experience: Providing a localized experience makes users feel more connected, leading to improved engagement and satisfaction.
  • Market Penetration: Localization helps businesses enter new markets more effectively, increasing adoption rates and customer loyalty.
  • Competitive Advantage: Apps with multi-language support are more likely to stand out in a crowded market.
  • Cultural Sensitivity: Adapting content to align with local customs and preferences demonstrates respect for cultural differences, fostering trust with users.

Setting Up i18n in React Native

1. Installing Required Dependencies

To implement internationalization in React Native, you’ll need to install the following packages:

Command : npm install react-native-localize i18next react-i18next

 2. Configure i18n

3. Configure component that utilizes both i18n and localization

Native-Side Implementation Requirements

Why Native Implementation is Critical

While React Native handles most of our UI localization through JavaScript, there are several scenarios where native-side implementation becomes essential:

System-Generated Messages

  • Native error messages
  • Permission dialogs
  • System alerts
  • File picker dialogs
  • Default date/time pickers

These messages come directly from the native iOS/Android systems and need proper localization configuration to display in the user’s language.

iOS Native Setup

1. Add supported languages to your Info.plist

2. Create Localization Files

  • In Xcode, select your project
  • Click “+” under “Localizations” in project info
  • Select languages you want to support
  • Create .strings files:

3. Create Localization Manager (Optional)

Android Native Setup

1. Create String Resources

2. Update Android Manifest

Add supported locales in android/app/src/main/AndroidManifest.xml

3. Create Language Helper (Optional)

Code for Creating language helper:

// LanguageHelper.kt package com.yourapp

import android.content.Context import android.os.Build import java.util.*

class LanguageHelper { companion object { fun setLocale(context: Context, languageCode: String) { val locale = Locale(languageCode) Locale.setDefault(locale)

       val resources = context.resources
        val configuration = resources.configuration
       
        configuration.setLocale(locale)
        context.createConfigurationContext(configuration)
    }

    fun getCurrentLanguage(context: Context): String {
        return if (Build.VERSION.SDK_INT >= Build.VERSION_CODES.N) {
            context.resources.configuration.locales[0].language
        } else {
            context.resources.configuration.locale.language
        }
    }

    fun getAvailableLanguages(context: Context): List<String> {
        return context.assets.locales.toList()
    }
}
  }

Conclusion

Implementing internationalization and localization in your React Native app requires careful planning and attention to detail. By following these best practices and guidelines, you can create a truly global app that provides an excellent user experience across different languages and regions.

References:
i18n docs
i18n React Native package